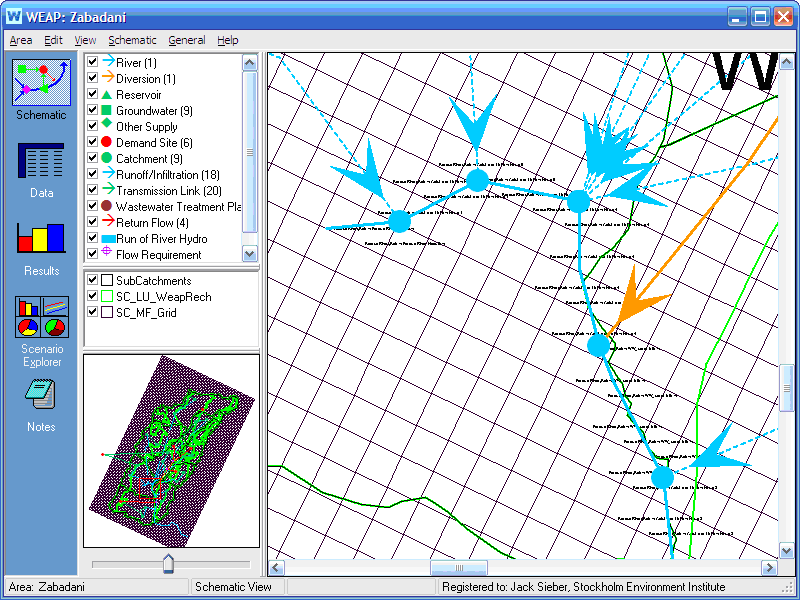
Each active MODFLOW cell is linked to one and only one WEAP groundwater node. (For a given row and column, every layer will be linked to the same groundwater node.) The linkage is established by a GIS shape file (.shp) that relates MODFLOW cells (by row and column number) with WEAP groundwater nodes (by name). The polygon shape file has one rectangular feature for each MODFLOW cell (row, column) and must be loaded as a background layer on the Schematic. For example, for a MODFLOW model with 20 rows, 40 columns and 3 layers, there would be 800 features in the shape file. The attribute table for the shape file must have fields for row number, column number and WEAP groundwater node name. Other optional fields are described below. This shape file will also be used to display MODFLOW results in WEAP.
In its most simple mode, you can have all withdrawals from and returns to a groundwater node be distributed evenly from/to all linked cells. For example, the water pumped by a demand site from a groundwater node could come evenly from all cells linked to the groundwater node. Similarly, all return flow to the groundwater node could be spread evenly to all linked cells. If cells areas are not uniform, then water will be spread proportionally to area. Inactive cells would not be linked to a WEAP groundwater node.
Optionally, you may link WEAP demand sites or catchments to subsets of MODFLOW cells. In this case, the demand site pumping will be spread evenly over only the cells linked to that demand site, and the return flow will only go to those linked cells, as well as from any losses from transmission links to groundwater. This linkage is made in the same shape file, with each demand site or catchment name listed for each cell it is linked to. Because demand sites may overlap catchment areas, there will be two additional fields in the shape file's attribute table, one for WEAP demand site names and one for WEAP catchment names. In this way, a cell could be linked to both a demand site and a catchment. If two or more demand sites (or catchments) are linked to the same groundwater node, and each demand is linked to a different group of cells, then the pumping from one demand site will be evenly distributed to its linked cells, while the pumping from the other demand site will come from its cells.
For even more precision, you may link WEAP catchment land classes or demand site sub-branches to smaller subsets of MODFLOW cells. In this case, flows to and from these branches will go to only the cells linked to those branches. These linkages are made in the same shape file. For linking land use branches, the linkage is made in an additional attribute field for the land use branch name. Land use branch names are listed for linked cells. For this option, the catchment must also be listed in its attribute field. For linking demand site sub-branches, append the name of the branch to the name of the demand site in the attribute field for linking demand sites, using the following syntax: [Demand site name]\[Sub-branch name], e.g., Agriculture West\Rose County Corn\Flood Irrigation. If you link one sub-branch, you must link them all for that demand site. Also, you must link at the lowest level of disaggregation, not an intermediate level (e.g., Agriculture West\Rose County Corn\Flood Irrigation, not Agriculture West\Rose County Corn).
Pumping to satisfy demand sites or catchment land classes (irrigation) can either be handled as pumping in the well file, or as negative recharge in the recharge file. The pump layer is specified in the Data View -- see Demand Site Pump Layer and Land Use Pump Layer variables. Specify layer=255 for a cell to have pumping come equally from all layers in that cell. To have withdrawals handled instead as negative recharge, specify layer=0. For all cells with pumping layer>0, WEAP will add cells to the well file if they are not already there. Use the PumpLayer function to specify fractions pumped from different layers, and to describe how these fractions vary by scenario and over time.
Demand Site return flows and Catchment infiltration become recharge in the Recharge package, to the cells linked to the demand sites (or their sub-branches) or land use branches, in the same proportion (among cells if more than one linked to a demand site or branch) as pumping for demand. To model injections wells for artificial recharge of demand site return flow, you can specify MODFLOW layer(s) into which to inject water (see Injection Layer). Leave blank or specify layer=0 to have return flows handled as recharge; specify layer=255 to inject equally to all layers in the cells. Use PumpLayer function to specify fractions to multiple layers.
If you are using the MODFLOW the River (RIV) or Drain (DRN) packages, you can link a subset of WEAP's river reaches each to one or more MODFLOW river or drain cells. The linkage is made in an additional attribute field for the WEAP river reach name, using the following syntax: [River name],[Reach name], e.g., Weaping River,Below Central Reservoir. Note that there is no space after the comma separating the river name from the reach name.
This GIS shape file can either be created by WEAP (see Create MODFLOW Linkage Shape File), or outside of WEAP using GIS software such as ArcGIS. If you create it using GIS software, copy it to the WEAP area subdirectory, and then load it as a vector layer on the Schematic. Now that you have added this shape file as a background layer and specified the MODFLOW name file, you are ready to link MODFLOW and WEAP. On the "Link to MODFLOW Groundwater Model" screen, click the "Choose shape file that has MODFLOW linkage information" button.
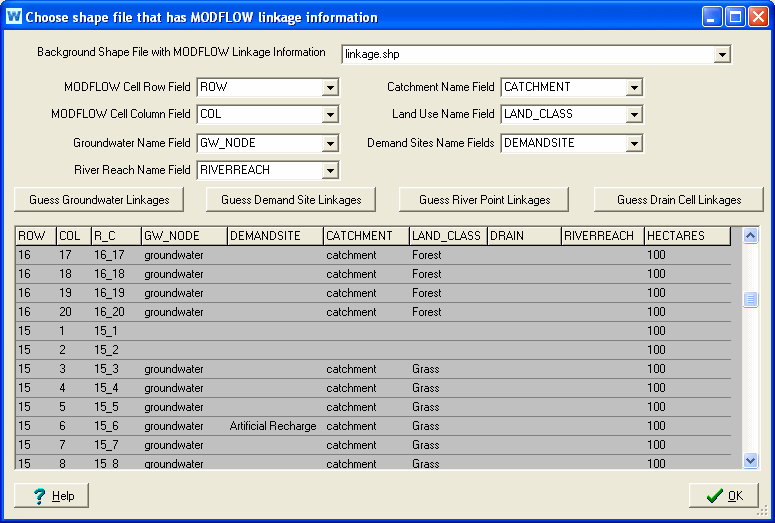
WEAP will try to guess which shape file layer contains the linkage information, by looking for a polygon layer with the number of features equal to the number of MODFLOW rows times the number of MODFLOW columns. Note that it should include every MODFLOW cell, including inactive cells. If it finds this layer, it will further try to guess which fields, based on their names, contain information for MODFLOW rows and columns and WEAP groundwater, river reach, catchment, land use branch, demand sites and pumping layers, based on the names of the fields in the shape files attribute table (.dbf).
If WEAP does not guess the correct shape file, choose it yourself by clicking on "Background Shape File with MODFLOW Linkage Information." In addition to the option here to create a new GIS layer (see next topic), you can also choose "Add existing shape file as new map layer". Once you had chosen or created a shape file, WEAP will display its contents in the grid below. If WEAP does not correctly guess any or all of the fields, choose them yourself. For the choice of Demand Site fields, you may choose more than one field. This would be necessary in cases where multiple demand sites withdrew or returned water to the same cells. As discussed above, only the Cell Row, Cell Column and Groundwater Name fields are required, depending on your model.
As a convenience, WEAP can try to guess which MODFLOW cells the WEAP groundwater nodes, demand sites and river reaches are linked to, based on proximity on the Schematic. Click the "Guess Groundwater Linkages" button for WEAP to assign the closest WEAP groundwater node to each active MODFLOW cell, which it will write into the shape file field specified by "Groundwater Name Field." (Every active cell will be linked.) Click the "Guess Demand Site Linkages" button for WEAP to assign the closest active MODFLOW cell to each WEAP Demand Site, which it will write into the shape file field specified by "Demand Site Names Field." (Each Demand Site will be linked to only one cell.) Click the "Guess River Point Linkages" button to have it guess WEAP river reaches for the cells in the River package, and "Guess Drain Cell Linkages" to have it guess WEAP river reaches for cells in the Drain package (if the River (RIV) and Drain (DRN) packages are included), which it will write into the shape file field specified by "River Reach Name Field." You are strongly advised to check which nodes and cells WEAP has guessed to make sure that they are correct. The easiest way to do this is to display the linkages on the Schematic. Go back to the Schematic and right click the MODFLOW Linkage shapefile (in the list of background layers on the left), and choose "Set Label to," then select each of the fields corresponding to groundwater name, demand site name or river reach name.
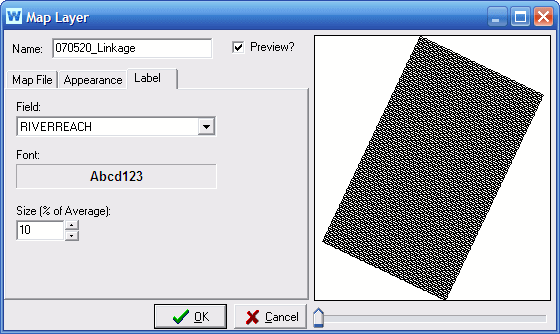
When you return to the Schematic, you will now see the river cells labels with the WEAP reach. Zoom in so that you can verify that the cells are correctly labeled. If they are not correct, you must edit the shape file's attribute table (.dbf), either within WEAP (Map Layer window) or outside of WEAP (ArcView or Excel), to enter the correct reach names, in the format: River name, Reach name.
The shape file's associated attribute table has fields for row, column, and for linking various WEAP elements to each cell: GW, Catchment, Land_Use, DemandSite and RiverReach. You will need to fill in this table, specifying which cells are linked to which WEAP elements. For example, the name of the WEAP groundwater node (in the Tutorial, the node is named "Groundwater") must be entered in the table in the column labeled GW for each cell that corresponds to the WEAP groundwater node. For the tutorial dataset, row 1, columns 6 through 17 correspond to the WEAP groundwater node, so you would enter "Groundwater" in table column GW for those cells. (As mentioned above, WEAP can guess which river reaches go with which cells, automatically filling values for the RiverReach column.)
There are several different ways to edit this table. To edit inside WEAP, go to the Map Layer window (double click on the layer name in the Schematic's Background Layer list), click the Edit button and type the values directly in the table. You can also edit the table in Microsoft Excel (the attribute table has the extension .dbf, e.g., "MODFLOW Linkage.dbf") or in any GIS program, such as ArcGIS. If you do have access to GIS software, this will be the easiest way to edit the table, but it can be done in WEAP. In order to edit the .dbf table in Excel or GIS, you must first close WEAP so that the file is not locked.
After you have chosen the shape file, specified which fields within it contain the linkage information and manually linked MODFLOW Cells to WEAP Elements, WEAP will be able to link the MODFLOW cells to the WEAP items. Verify on the MODFLOW linkage screen that all cells are linked.